1、spring优点
Spring是一个开源免费的框架,容器
spring是一个轻量级的框架,非侵入式
控制反转IOC,面向切面AOP
对事物的支持,对框架的支持
一句话概括:是一个轻量级的控制反转(IOC)和面向切面(AOP)的容器(框架)。
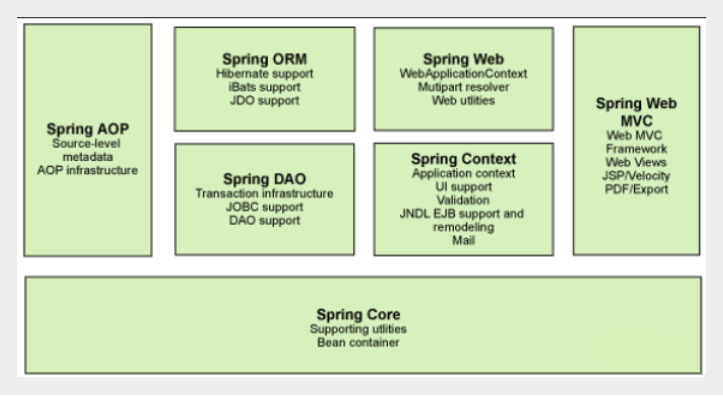
1.2、组成
Spring框架是一个分层架构,由7个定义良好的模块组成。Spring模块构建在核心容器之上,核心容器定义了创建、配置和管理bean的方式。
组成Spring框架的每个模块(或组件)都可以单独存在,或者与其他一个或多个模块联合实现。每个模块的功能如下。
核心容器:核心容器提供Spring框架的基本功能。核心容器的主要组件是BeanFactory使用控制反转 (IOC)模式将应用程序的配置和依赖范围与实际的应用程序代码分开。
Spring 上下文:Spring上下文是一个配置文件,向Spring框架提供上下文信息。Spring上下文包括企业服务,例如JNDI、EJB、电子邮件、国际化、校验和调度功能。
Spring AOP:通过配置管理特性,SpringAOP模块直接将面向切面的编程功能,集成到了Spring框架中。所以,可以很容易地使Spring框架管理任何支持AOP的对象。SpringAOP模块为基于Spring的应用程序中的对象提供了事物管理服务。通过使用SpringAOP,不用依赖组件,就可以将声明性事务管理集成到应用程序中。
Spring DAO:JDBC DAO抽象层提供了有意义的异常层次结构,可用该结构来管理异常处理和不同数据库供应商抛出的错误信息。异常层次结构简化了错误处理,并且极大的降低了需要编写的异常代码数量(例如打开和关闭链接)。Spring DAO的面向JDBC的异常遵从通用的DAO异常层次结构。
Spring ORM:Spring框架插入了若干个ORM框架,从而提供了ORM的对象关系工具,其中包括JDO、Hibernate和MyBatis。所有这些都遵从Spring的通用事物和DAO异常层次结构。
Spring Web模块:Web上下文模块建立在应用程序上下文模块之上,为基于Web的应用程序提供了上下文。所以,Spring框架支持与Jakarta Struts的集成。Web模块还简化了处理多部分请求以及将请求参数绑定到域对象的工作。
Spring MVC框架:MVC框架是一个全功能的构建Web应用程序的MVC实现。通过策略接口,MVC框架变为高度可配置的,MVC容纳了大量视图技术,其中包括JSP、Velocity、Tiles、iText和POI。
2、IOC基础 这是我们以前写代码的方式:
先写一个UserDao接口
1
2
3
public interface UserDao { public void getUser () ; }
再写Dao的实现类
1
2
3
4
5
6
public class UserDaoImpl implements UserDao { @Override public void getUser () { System.out.println("获取用户数据" ); } }
然后写UserService的接口
1
2
3
public interface UserService { public void getUser () ; }
最后写Service的实现类
1
2
3
4
5
6
7
8
public class UserServiceImpl implements UserService { private UserDao userDao = new UserDaoImpl (); @Override public void getUser () { userDao.getUser(); } }
这是我们最初始的方式,但是假如需求发生变化,需要在UserDao的实现类增加一个。
1
2
3
4
5
6
public class UserDaoMySqlImpl implements UserDao { @Override public void getUser () { System.out.println("MySql获取用户数据" ); } }
紧接着我们要去使用Mysql的话,我们就需要去service实现类里面修改对应的实现
1
2
3
4
5
6
7
8
public class UserServiceImpl implements UserService { private UserDao userDao = new UserDaoMySqlImpl (); @Override public void getUser () { userDao.getUser(); } }
再假设,我们的需求又发生变化又要增加一个UserDao的实现类。
1
2
3
4
5
6
public class UserDaoOracleImpl implements UserDao { @Override public void getUser () { System.out.println("Oracle获取用户数据" ); } }
之后我们又需要去service实现类里面修改对应的实现,假设我们类似的需求比较多,这就需要我们修改大量的代码,这种设计的耦合性太高了。
那我们应该如何解决呢?
我们可以在需要用到他的地方,不去实现它,而是留出一个接口,利用set。
1
2
3
4
5
6
7
8
9
10
11
12
public class UserServiceImpl implements UserService { private UserDao userDao; public void setUserDao (UserDao userDao) { this .userDao = userDao; } @Override public void getUser () { userDao.getUser(); } }
然后进行测试一下
1
2
3
4
5
6
7
8
9
10
@Test public void test () { UserServiceImpl service = new UserServiceImpl (); service.setUserDao( new UserDaoMySqlImpl () ); service.getUser(); service.setUserDao( new UserDaoOracleImpl () ); service.getUser(); }
运行起来没有什么区别,但是这个已经发生了根本性的变化,很多地方都不一样了,原来的方式,所有的东西是由程序去进行控制创建,而现在是由我们自行控制创建对象,把主动权交给了调用者,程序不用去管怎么创建,怎么实现,它现在只负责提供一个接口。
这种思想,从本质上解决了问题,我们程序员不再去管理对象的创建了,更多的去关注业务的实现,耦合性大大降低,这也就是IOC的原型。
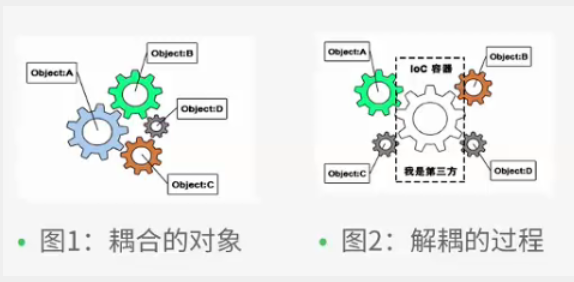
3、IOC本质 控制反转(IOC)是一种设计思想,DI(依赖注入)是实现的IOC的一种方法,也有人认为DI只是IOC的另一种说法。没有IOC的程序中,我们使用面向对象编程,对象的创建由程序自己控制,控制反转后将对象的创建转移给第三方,个人认为所谓的控制反转就是:获得对象的方式反转了。
IOC是Spring框架的核心内容 ,使用多种方式完美的实现了IOC,可以使用XM配置,也可以使用注解,新版的Spring也可以零配置实现IOC。
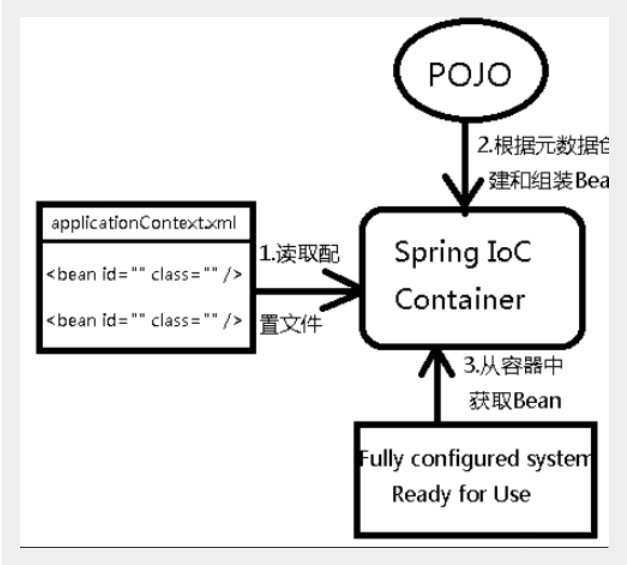
Spring容器在初始化时先读取配置文件,根据配置文件或元数据创建与组织对象存入容器中,程序使用时再从IOC容器中取出需要的对象。
采用XML方式配置Bean的时候,Bean的定义信息是和现实分离的,而采用注解的方式可以把两者合为一体,Bean的定义信息直接以注解的形式定义在实现类中,从而达到了零配置的目的。
控制反转是一种通过描述(XML或注解)并通过第三方去生产或获取特定对象的方式。在Spring中实现控制反转的是IOC容器,其实方式是依赖注入(DI)。
3.1、IOC实例 1、首先在maven中导入依赖
1 2 3 4 5 6 <dependency > <groupId > org.springframework</groupId > <artifactId > spring-webmvc</artifactId > <version > 5.2.7.RELEASE</version > </dependency >
2、创建一个实例
1
2
3
4
5
6
7
8
9
10
11
12
13
14
15
16
17
18
19
package pojo;public class Hello { private String str; public String getStr () { return str; } public void setStr (String str) { this .str = str; } @Override public String toString () { return "Holle [str=" + str + "]" ; } }
3、在resource里面创建一个xml文件,文件头可去spring官方文档中取
1
2
3
4
5
6
7
8
9
10
11
12
13
14
15
16
17
18
19
20
21
<?xml version="1.0" encoding="UTF-8" ?> <beans xmlns ="http://www.springframework.org/schema/beans" xmlns:xsi ="http://www.w3.org/2001/XMLSchema-instance" xsi:schemaLocation ="http://www.springframework.org/schema/beans https://www.springframework.org/schema/beans/spring-beans.xsd" > <bean id ="hello" class ="pojo.Hello" > <property name ="str" value ="Spring" /> </bean > </beans >
4、创建一个测试类
1
2
3
4
5
6
7
8
9
10
11
12
13
14
15
16
17
18
package holle1;import org.springframework.context.ApplicationContext;import org.springframework.context.support.ClassPathXmlApplicationContext;import pojo.Hello;public class MyTest { public static void main (String[] args) { ApplicationContext context = new ClassPathXmlApplicationContext ("beans.xml" ); Hello holle = (Hello) context.getBean("hello" ); System.out.println(holle.toString()); } }
核心是利用了set方法注入,所以必须要有set方法。
思考:
Hello对象是谁创建的? 是由Spring创建的
Hello对象的属性是怎么设置的? 是由Spring容器设置的
这个过程就叫控制翻转
控制: 谁来控制对象的创建,传统应用程序的对象是由程序本身控制的,使用Spring后,对象是由Spring来创建的。
翻转: 程序本身不创建对象,而被动的接受对象。
IOC是一种编程思想,由主动的编程变成被动的接受。
4、IOC创建对象的方式 1、使用无参构造穿件对象,默认方式
2、使用有参构造(如下)
下标赋值
1
2
3
4
5
6
7
8
9
10
<?xml version="1.0" encoding="UTF-8" ?> <beans xmlns ="http://www.springframework.org/schema/beans" xmlns:xsi ="http://www.w3.org/2001/XMLSchema-instance" xsi:schemaLocation ="http://www.springframework.org/schema/beans https://www.springframework.org/schema/beans/spring-beans.xsd" > <bean id ="user" class ="pojo.User" > <constructor-arg index ="0" value ="chen" /> </bean > </beans >
类型赋值(不建议使用)
1 2 3 <bean id ="user" class ="pojo.User" > <constructor-arg type ="java.lang.String" value ="kuang" /> </bean >
直接通过参数名(常用)
1 2 3 4 <bean id ="user" class ="pojo.User" > <constructor-arg name ="name" value ="kuang" > </constructor-arg > </bean >
注册的对象已被初始化,并且默认创建模式为单例模式。
5、Spring配置 1、别名
1 2 3 4 5 6 7 8 <bean id ="user" class ="pojo.User" > <constructor-arg name ="name" value ="chen" > </constructor-arg > </bean > <alias name ="user" alias ="userLove" />
2、注册bean的配置
1 2 3 4 5 6 7 8 9 <bean id ="user" class ="pojo.User" name ="u1 u2,u3;u4" > <property name ="name" value ="chen" /> </bean >
3、import
import一般用于团队开发,可以将多个配置文件导入合并为一个
假设,现在项目中有多个人开发,这三个人复制不同的类开发,不同的类需要注册在不同的bean中,我们可以利
张三(beans.xm1)
李四(beans2.xm1)
王五(beans3.xm1)
1 2 3 <import resource ="beans.xm1" /> <import resource ="beans2.xml" /> <import resource ="beans3.xm1" />
并且如果合并的文件中,有重复的bean也会合并。
6、bean各种类型的注入 首先创建一个复杂的类
1
2
3
4
5
6
7
8
9
10
11
12
13
14
15
16
17
18
19
20
21
22
23
24
25
26
27
28
29
30
31
32
33
package pojo;import java.util.*;@Get @Set public class Student { private String name; private Address address; private String[] books; private List<String> hobbies; private Map<String, String> card; private Set<String> game; private Properties infor; private String wife; @Override public String toString () { return "Student{" +"\n" + "name='" + name + '\'' +"\n" + ", address=" + address.toString() +"\n" + ", books=" + Arrays.toString(books) +"\n" + ", hobbies=" + hobbies +"\n" + ", card=" + card +"\n" + ", game=" + game +"\n" + ", infor=" + infor +"\n" + ", wife='" + wife + '\'' +"\n" + '}' ; } }
Address类
1
2
3
4
5
6
7
8
9
10
11
12
13
14
15
16
17
18
19
20
21
package pojo;public class Address { private String address; public String getAddress () { return address; } public void setAddress (String address) { this .address = address; } @Override public String toString () { return "Address{" + "address='" + address + '\'' + '}' ; } }
设置bean
1
2
3
4
5
6
7
8
9
10
11
12
13
14
15
16
17
18
19
20
21
22
23
24
25
26
27
28
29
30
31
32
33
34
35
36
37
38
39
40
41
42
43
44
45
46
47
48
49
50
51
52
53
54
55
56
57
58
59
60
61
62
63
64
65
66
<?xml version="1.0" encoding="UTF-8" ?> <beans xmlns ="http://www.springframework.org/schema/beans" xmlns:xsi ="http://www.w3.org/2001/XMLSchema-instance" xsi:schemaLocation ="http://www.springframework.org/schema/beans https://www.springframework.org/schema/beans/spring-beans.xsd" > <bean id ="address" class ="pojo.Address" > <property name ="address" value ="address你好" /> </bean > <bean id ="student" class ="pojo.Student" > <property name ="name" value ="name你好" /> <property name ="address" ref ="address" /> <property name ="books" > <array > <value > 三国</value > <value > 西游</value > <value > 水浒</value > </array > </property > <property name ="hobbies" > <list > <value > 唱</value > <value > 跳</value > <value > rap</value > <value > 篮球</value > </list > </property > <property name ="card" > <map > <entry key ="username" value ="root" /> <entry key ="password" value ="root" /> </map > </property > <property name ="game" > <set > <value > wangzhe</value > <value > lol</value > <value > galname</value > </set > </property > <property name ="wife" > <null > </null > </property > <property name ="infor" > <props > <prop key ="id" > 20200802</prop > <prop key ="name" > cbh</prop > </props > </property > </bean > </beans >
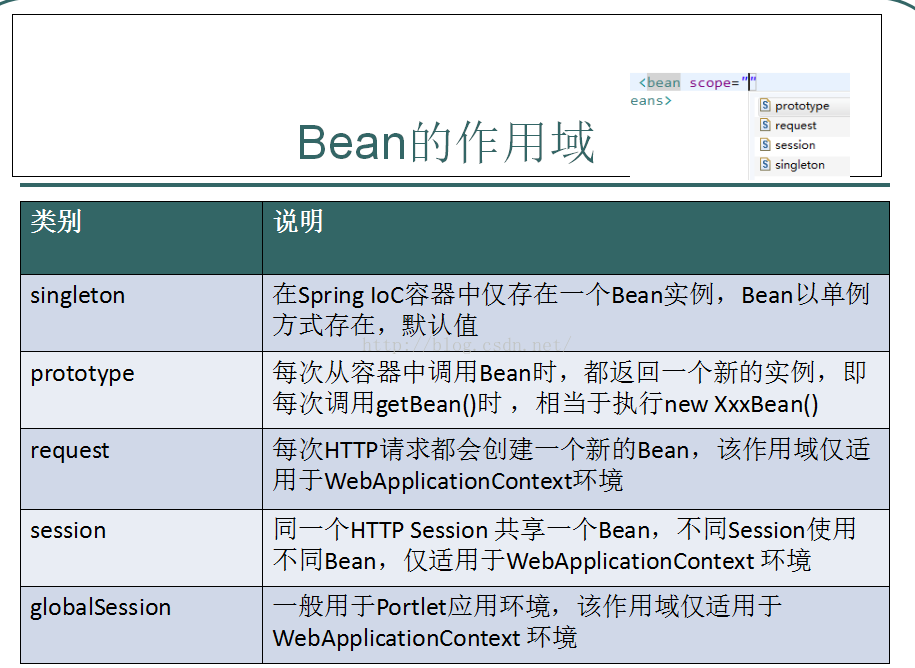
6.2、bean的作用域
Spring默认为单例模式,可以通过scope去修改
1 <bean id ="user2" class ="pojo.User" c:name ="cxk" c:age ="19" scope ="singleton" > </bean >
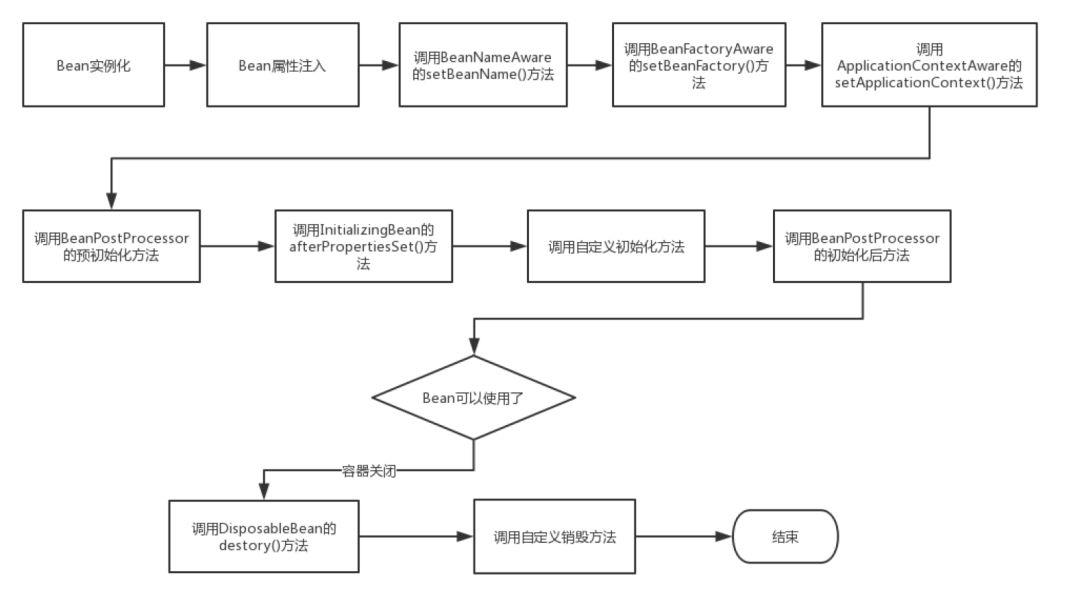
6.3、bean的生命周期
如上图所示,Bean 的生命周期还是比较复杂的,下面来对上图每一个步骤做文字描述:
Spring启动,查找并加载需要被Spring管理的bean,进行Bean的实例化
Bean实例化后对将Bean的引入和值注入到Bean的属性中
如果Bean实现了BeanNameAware接口的话,Spring将Bean的Id传递给setBeanName()方法
如果Bean实现了BeanFactoryAware接口的话,Spring将调用setBeanFactory()方法,将BeanFactory容器实例传入
如果Bean实现了ApplicationContextAware接口的话,Spring将调用Bean的setApplicationContext()方法,将bean所在应用上下文引用传入进来。
如果Bean实现了BeanPostProcessor接口,Spring就将调用他们的postProcessBeforeInitialization()方法。
如果Bean 实现了InitializingBean接口,Spring将调用他们的afterPropertiesSet()方法。类似的,如果bean使用init-method声明了初始化方法,该方法也会被调用
如果Bean 实现了BeanPostProcessor接口,Spring就将调用他们的postProcessAfterInitialization()方法。
此时,Bean已经准备就绪,可以被应用程序使用了。他们将一直驻留在应用上下文中,直到应用上下文被销毁。
如果bean实现了DisposableBean接口,Spring将调用它的destory()接口方法,同样,如果bean使用了destory-method 声明销毁方法,该方法也会被调用。
7、bean的自动装配
自动装配是Spring满足bean依赖的一种方式
Spring会在上下文自动寻找,并自动给bean装配属性
7.1、自动装配 首先建立几个类
Cat
1
2
3
4
5
public class Cat { public void shut () { System.out.println("miao~" ); } }
Dog
1
2
3
4
5
6
7
public class Dog { public void shut () { System.out.println("wang~" ); } }
People
1
2
3
4
5
6
7
8
9
10
11
12
13
14
15
16
17
18
19
20
21
22
23
24
25
26
27
28
29
30
31
32
33
34
35
36
37
38
39
package pojo;public class People { private Cat cat; private Dog dog; private String name; public Cat getCat () { return cat; } public void setCat (Cat cat) { this .cat = cat; } public Dog getDog () { return dog; } public void setDog (Dog dog) { this .dog = dog; } public String getName () { return name; } public void setName (String name) { this .name = name; } @Override public String toString () { return "People{" + "cat=" + cat + ", dog=" + dog + ", name='" + name + '\'' + '}' ; } }
xml配置:通过byType自动装配
1
2
3
4
5
6
7
8
9
10
11
12
13
14
15
16
<?xml version="1.0" encoding="UTF-8" ?> <beans xmlns ="http://www.springframework.org/schema/beans" xmlns:xsi ="http://www.w3.org/2001/XMLSchema-instance" xsi:schemaLocation ="http://www.springframework.org/schema/beans https://www.springframework.org/schema/beans/spring-beans.xsd" > <bean id ="cat" class ="pojo.Cat" /> <bean id ="dog" class ="pojo.Dog" /> <bean id ="people" class ="pojo.People" autowire ="byType" > <property name ="name" value ="cbh" > </property > </bean > </beans >
注意:保证类型唯一,否则报错
xml配置 -> byName 自动装配
1 2 3 4 5 6 7 8 9 <bean id ="cat" class ="pojo.Cat" /> <bean id ="dog" class ="pojo.Dog" /> <bean id ="people" class ="pojo.People" autowire ="byName" > <property name ="name" value ="cbh" > </property > </bean >
注意:保证name唯一,否则报错
7.2、使用注解实现自动装配 jdk1.5支持的注解,spring2.5支持的注解
首先要加上context约束
1
2
3
4
5
6
7
8
9
10
11
<?xml version="1.0" encoding="UTF-8" ?> <beans xmlns ="http://www.springframework.org/schema/beans" xmlns:xsi ="http://www.w3.org/2001/XMLSchema-instance" xmlns:context ="http://www.springframework.org/schema/context" xsi:schemaLocation ="http://www.springframework.org/schema/beans https://www.springframework.org/schema/beans/spring-beans.xsd http://www.springframework.org/schema/context https://www.springframework.org/schema/context/spring-context.xsd" > <context:annotation-config /> </beans >
使用注解@Autowired 默认是byType方式,如果匹配不上,就会byName
1
2
3
4
5
6
7
public class People { @Autowired private Cat cat; @Autowired private Dog dog; private String name; }
@Autowired不能唯一装配时,需要@Autowired+@Qualifier
如果@Autowired自动装配环境比较复杂。自动装配无法通过一个注解完成的时候,可以使用@Qualifier(value = “dog”)去配合使用,指定一个唯一的id对象
1
2
3
4
5
6
7
8
public class People { @Autowired private Cat cat; @Autowired @Qualifier(value = "dog") private Dog dog; private String name; }
使用注解@Resource 默认是byName方式,如果匹配不上,就会byType
1
2
3
4
5
6
7
public class People { Resource(name="cat" ) private Cat cat; Resource(name="dog" ) private Dog dog; private String name; }
区别:
都是用来自动装配的,都可以放在属性字段上
@Autowired通过byType的方式实现,而且必须要求这个对象存在!【常用】
@Resource默认通过byname的方式实现,如果找不到名字,则通过byType实现!如果两个都找不到的情况下,就报错!【常用】
执行顺序不同:@Autowired通过byType的方式实现。@Resource默认通过byname的方式实现
使用注解@Component 使用此注解就可以不用在xml文件中,装配bean了,因为这个注解就是将对象交给Spring去管理
1 <context:component-scan base-package ="com.pojo" />
记得在xml文件中开启注解的扫描(有了< context:component-scan>,另一个< context:annotation-config/>标签可以移除掉,因为已经被包含进去了。)
1 2 3 4 5 6 @Component public class User { public String name = "小明" ; }
属性如何注入@value 1 2 3 4 5 6 7 8 9 10 11 12 @Component public class User { @value("小明") public String name; public void setName (String name) { this .name = name; } }
7.3、使用java的方式配置Spring 1 2 3 4 5 6 7 @Data @AllArgsConstructor @NoArgsConstructor public class User { @Value("xiao") private String name; }
配置文件:使用config中的UserConfig.java
1 2 3 4 5 6 7 @Configuration public class UserConfig { @Bean public User getUser () { return new User (); } }
注意:
1 2 3 4 5 6 7 8 public class MyTest { public static void main (String[ ] args) { ApplicationContext context = new AnnotationConfigApplicationContext (UserConfig.Class); User getUser = (User)context.getBean( "getUser" ); System.out.Println(getUser.getName()); } }
@Import(UserConfig2.class): 这个注解作用也是合并配置类
8、静态代理 代理模式是SpringBoot的底层
分类:动态代理和静态代理
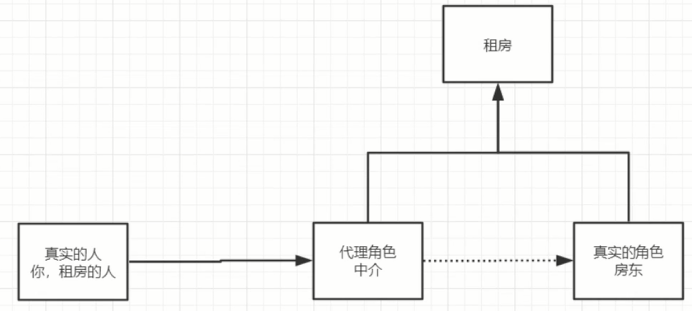
8.1、静态代理 角色分析:
抽象角色:一般会使用接口或者抽象类来解决
真实角色:被代理的角色
代理角色:代理真实角色,代理真是角色后,我们一般会做一些附庸操作
客户:可以访问代理对象的人
代码实例:
1、接口
1 2 3 4 package pojo;public interface Host { public void rent () ; }
2、真实角色
1 2 3 4 5 6 7 package pojo;public class HostMaster implements Host { public void rent () { System.out.println("房东要出租房子" ); } }
3、代理角色
1 2 3 4 5 6 7 8 9 10 11 12 13 14 15 16 17 18 19 20 21 22 23 24 25 26 27 28 29 30 31 32 33 package pojo;public class Proxy { public Host host; public Proxy () { } public Proxy (Host host) { super (); this .host = host; } public void rent () { seeHouse(); host.rent(); fee(); sign(); } public void seeHouse () { System.out.println("看房子" ); } public void fee () { System.out.println("收中介费" ); } public void sign () { System.out.println("签合同" ); } }
4、客户端访问代理角色
1 2 3 4 5 6 7 8 9 10 11 12 13 14 15 16 17 18 package holle4_proxy;import pojo.Host;import pojo.HostMaster;import pojo.Proxy;public class My { public static void main (String[] args) { Host host = new HostMaster (); Proxy proxy = new Proxy (host); proxy.rent(); } }
代理模式的好处:
可以使真实角色的操作更加纯粹!不用去关心一些公共的业务
公共事务就交给代理角色,实现了业务的分工
公共事务发生扩展的时候,方便几种管理
缺点:一个真实角色就会产生一个代理角色,代码量会翻倍,开发效率降低
8.2、动态代理 动态代理和静态代理角色一样,动态代理底层就是反射机制
动态代理是动态生成的,不是我们直接写好的
动态代理(两大类):基于接口,基于类
基于接口:jdk的动态代理
基于类:cglib
java字节码实现:javaisit
了解两个类
1、Proxy:代理
2、InvocationHandler:调用处理程序
实例代码:
接口:
1 2 3 4 5 6 package pojo2;public interface Host { public void rent () ; }
接口实现类
1 2 3 4 5 6 7 package pojo2;public class HostMaster implements Host { public void rent () { System.out.println("房东要租房子" ); } }
代理角色的处理程序类
1 2 3 4 5 6 7 8 9 10 11 12 13 14 15 16 17 18 19 20 21 22 23 24 25 26 27 28 29 30 31 32 33 34 35 36 37 38 39 40 41 42 43 44 45 46 47 48 package pojo2;import java.lang.reflect.InvocationHandler;import java.lang.reflect.Method;import java.lang.reflect.Proxy;public class ProxyInvocationHandler implements InvocationHandler { public HostMaster hostMaster ; public void setHostMaster (HostMaster hostMaster) { this .hostMaster = hostMaster; } public Object getProxy () { return Proxy.newProxyInstance(this .getClass().getClassLoader(), hostMaster.getClass().getInterfaces(), this ); public Object invoke (Object proxy, Method method, Object[] args) throws Throwable { seeHouse(); Object result = method.invoke(hostMaster, args); fee(); return result; } public void seeHouse () { System.out.println("看房子" ); } public void fee () { System.out.println("收中介费" ); } }
用户类
1 2 3 4 5 6 7 8 9 10 11 12 13 14 15 16 17 18 19 20 21 22 23 24 25 26 27 package holle4_proxy;import pojo2.Host;import pojo2.Host2;import pojo2.HostMaster;import pojo2.ProxyInvocationHandler;public class My2 { public static void main (String[] args) { HostMaster hostMaster = new HostMaster (); ProxyInvocationHandler pih = new ProxyInvocationHandler (); pih.setHostMaster(hostMaster); Host proxy = (Host) pih.getProxy(); proxy.rent(); } }
可以将代理程序类改成一个万能类
1 2 3 4 5 6 7 8 9 10 11 12 13 14 15 16 17 18 19 20 21 22 23 24 public class ProxyInvocationHandler implements InvocationHandler { public Object target; public void setTarget (Object target) { this .target = target; } public Object getProxy () { return Proxy.newProxyInstance(this .getClass().getClassLoader(), target.getClass().getInterfaces(), this ); } public Object invoke (Object proxy, Method method, Object[] args) throws Throwable { Object result = method.invoke(target, args); return result; } }
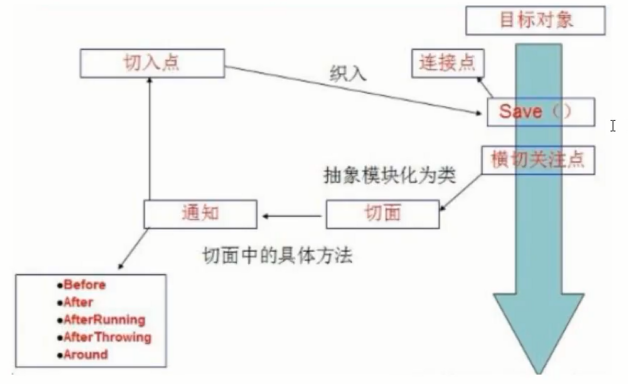
9、AOP 9.1、什么是AOP 在软件业,AOP为Aspect Oriented Programming的缩写,意为:面向切面编程,通过预编译方
9.2、AOP在Spring中的使用
提供声明式事务,允许用户自定义切面
横切关注点:跨越应用程序多个模块的方法或功能。即是,与我们业务逻辑无关的,但是我们需要关注的部分,就是横切关注点。如日志,安全,缓存,事务等等…
切面(Aspect):横切关注点 被模块化的特殊对象。即,它是一个类。(Log类)
通知(Advice):切面必须要完成的工作。即,它是类中的一个方法。(Log类中的方法)
目标(Target):被通知对象。(生成的代理类)
代理(Proxy):向目标对象应用通知之后创建的对象。(生成的代理类)
切入点(PointCut):切面通知执行的”地点”的定义。(最后两点:在哪个地方执行,比如:method.invoke())
连接点(JointPoint):与切入点匹配的执行点。
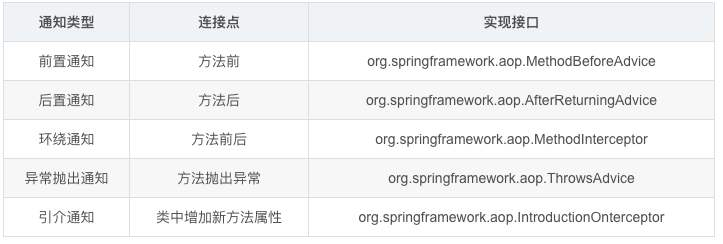
在SpringAop中,通过Advice定义横切逻辑,Spring中支持5种类型的Advice
即AOP在不改变原有代码的基础上,去实现新的功能
9.3、使用Spring实现AOP 首先导入依赖
1 2 3 4 5 6 <dependency > <groupId > org.aspectj</groupId > <artifactId > aspectjweaver</artifactId > <version > 1.9.4</version > </dependency >
方法一:使用原生spring接口
在配置文件中
1 2 3 4 5 6 7 8 9 10 11 12 13 14 15 16 17 18 19 20 21 22 23 24 25 26 <?xml version="1.0" encoding="UTF-8" ?> <beans xmlns ="http://www.springframework.org/schema/beans" xmlns:xsi ="http://www.w3.org/2001/XMLSchema-instance" xmlns:aop ="http://www.springframework.org/schema/aop" xsi:schemaLocation ="http://www.springframework.org/schema/beans https://www.springframework.org/schema/beans/spring-beans.xsd http://www.springframework.org/schema/aop https://www.springframework.org/schema/aop/spring-aop.xsd" > <bean id ="userservice" class ="service.UserServiceImpl" /> <bean id ="log" class ="log.Log" /> <bean id ="afterLog" class ="log.AfterLog" /> <aop:config > <aop:pointcut id ="pointcut" expression ="execution(* service.UserServiceImpl.*(..))" /> <aop:advisor advice-ref ="log" pointcut-ref ="pointcut" /> <aop:advisor advice-ref ="afterLog" pointcut-ref ="pointcut" /> </aop:config > </beans >
execution(返回类型,类名,方法名(参数)) -> execution(* com.service., (…))
UserService.java
1 2 3 4 5 6 7 package service;public interface UserService { public void add () ; public void delete () ; public void query () ; public void update () ; }
UserService 的实现类 UserServiceImp.java
1 2 3 4 5 6 7 8 9 10 11 12 13 14 15 16 17 package service;public class UserServiceImpl implements UserService { public void add () { System.out.println("add增" ); } public void delete () { System.out.println("delete删" ); } public void update () { System.out.println("update改" ); } public void query () { System.out.println("query查" ); } }
前置Log.java
1 2 3 4 5 6 7 8 9 10 11 12 package log;import org.springframework.aop.MethodBeforeAdvice;import java.lang.reflect.Method;public class Log implements MethodBeforeAdvice { public void before (Method method, Object[] args, Object target) throws Throwable { System.out.println(target.getClass().getName()+"的" +method.getName()+"被执行了" ); } }
后置AfterLog.java
1 2 3 4 5 6 7 8 9 10 package log;import java.lang.reflect.Method;import org.springframework.aop.AfterReturningAdvice;public class AfterLog implements AfterReturningAdvice { public void afterReturning (Object returnValue, Method method, Object[] args, Object target) throws Throwable { System.out.println("执行了" +method.getName()+"方法,返回值是" +returnValue); } }
测试类
1 2 3 4 5 6 7 8 9 10 11 import org.springframework.context.ApplicationContext;import org.springframework.context.support.ClassPathXmlApplicationContext;import service.UserService;public class MyTest5 { public static void main (String[] args) { ApplicationContext context = new ClassPathXmlApplicationContext ("applicationContext.xml" ); UserService userService = (UserService) context.getBean("userservice" ); userService.add(); } }
方法二:自定义实现AOP
1 2 3 4 5 6 7 8 9 10 11 12 13 14 15 16 17 18 19 20 21 22 23 24 25 26 <?xml version="1.0" encoding="UTF-8" ?> <beans xmlns ="http://www.springframework.org/schema/beans" xmlns:xsi ="http://www.w3.org/2001/XMLSchema-instance" xmlns:aop ="http://www.springframework.org/schema/aop" xsi:schemaLocation ="http://www.springframework.org/schema/beans https://www.springframework.org/schema/beans/spring-beans.xsd http://www.springframework.org/schema/aop https://www.springframework.org/schema/aop/spring-aop.xsd" > <bean id ="userservice" class ="service.UserServiceImpl" /> <bean id ="log" class ="log.Log" /> <bean id ="afterLog" class ="log.AfterLog" /> <bean id ="diy" class ="diy.DiyPointcut" /> <aop:config > <aop:aspect ref ="diy" > <aop:pointcut id ="point" expression ="execution(* service.UserServiceImpl.*(..))" /> <aop:before method ="before" pointcut-ref ="point" /> <aop:after method ="after" pointcut-ref ="point" /> </aop:aspect > </aop:config > </beans >
1 2 3 4 5 6 7 8 9 10 11 package diy;public class DiyPointcut { public void before () { System.out.println("插入到前面" ); } public void after () { System.out.println("插入到后面" ); } }
测试
1 2 3 4 5 6 7 8 9 public class MyTest5 { public static void main (String[] args) { ApplicationContext context = new ClassPathXmlApplicationContext ("applicationContext.xml" ); UserService userService = (UserService) context.getBean("userservice" ); userService.add(); } }
方法三:使用注解实现
1 2 3 4 5 6 7 8 9 10 11 12 13 14 15 16 17 18 19 20 <?xml version="1.0" encoding="UTF-8" ?> <beans xmlns ="http://www.springframework.org/schema/beans" xmlns:xsi ="http://www.w3.org/2001/XMLSchema-instance" xmlns:aop ="http://www.springframework.org/schema/aop" xsi:schemaLocation ="http://www.springframework.org/schema/beans https://www.springframework.org/schema/beans/spring-beans.xsd http://www.springframework.org/schema/aop https://www.springframework.org/schema/aop/spring-aop.xsd" > <bean id ="userservice" class ="service.UserServiceImpl" /> <bean id ="diyAnnotation" class ="diy.DiyAnnotation" > </bean > <aop:aspectj-autoproxy /> </beans >
DiyAnnotation.java
1 2 3 4 5 6 7 8 9 10 11 12 13 14 15 16 17 18 19 20 21 22 23 24 25 26 27 28 29 30 package diy;import org.aspectj.lang.ProceedingJoinPoint;import org.aspectj.lang.annotation.After;import org.aspectj.lang.annotation.Around;import org.aspectj.lang.annotation.Aspect;import org.aspectj.lang.annotation.Before;@Aspect public class DiyAnnotation { @Before("execution(* service.UserServiceImpl.*(..))") public void before () { System.out.println("=====方法执行前=====" ); } @After("execution(* service.UserServiceImpl.*(..))") public void after () { System.out.println("=====方法执行后=====" ); } @Around("execution(* service.UserServiceImpl.*(..))") public void around (ProceedingJoinPoint joinPoint) throws Throwable { System.out.println("环绕前" ); Object proceed = joinPoint.proceed(); System.out.println("环绕后" ); } }
测试
1 2 3 4 5 6 7 8 public class MyTest5 { public static void main (String[] args) { ApplicationContext context = new ClassPathXmlApplicationContext ("applicationContext.xml" ); UserService userService = (UserService) context.getBean("userservice" ); userService.add(); } }
10、整合mybatis mybatis的配置流程:
编写实体类
编写核心配置文件
编写接口
编写Mapper.xmi
测试
10.1、mybatis-spring方式一
编写数据源配置
sqISessionFactory
sqISessionTemplate(相当于sqISession)
需要给接口加实现类【new】
将自己写的实现类,注入到Spring中
测试!
首先导入依赖
1 2 3 4 5 6 7 8 9 10 11 12 13 14 15 16 17 18 19 20 21 22 23 24 25 26 27 28 29 30 31 32 33 34 35 36 37 38 39 40 41 42 43 44 45 46 47 48 49 50 51 52 53 54 55 56 57 58 59 60 61 62 63 64 65 66 67 68 69 70 <dependencies > <dependency > <groupId > org.springframework</groupId > <artifactId > spring-webmvc</artifactId > <version > 5.2.7.RELEASE</version > </dependency > <dependency > <groupId > org.aspectj</groupId > <artifactId > aspectjweaver</artifactId > <version > 1.9.4</version > </dependency > <dependency > <groupId > org.springframework</groupId > <artifactId > spring-jdbc</artifactId > <version > 5.2.7.RELEASE</version > </dependency > <dependency > <groupId > org.mybatis</groupId > <artifactId > mybatis</artifactId > <version > 3.5.2</version > </dependency > <dependency > <groupId > org.mybatis</groupId > <artifactId > mybatis-spring</artifactId > <version > 2.0.4</version > </dependency > <dependency > <groupId > mysql</groupId > <artifactId > mysql-connector-java</artifactId > <version > 8.0.12</version > </dependency > <dependency > <groupId > org.projectlombok</groupId > <artifactId > lombok</artifactId > <version > 1.18.12</version > </dependency > </dependencies > <build > <resources > <resource > <directory > src/main/java</directory > <includes > <include > **/*.properties</include > <include > **/*.xml</include > </includes > <filtering > false</filtering > </resource > <resource > <directory > src/main/resources</directory > <includes > <include > **/*.properties</include > <include > **/*.xml</include > </includes > <filtering > false</filtering > </resource > </resources > </build >
实体类
1 2 3 4 5 6 7 8 package pojo;import lombok.Data;@Data public class User { private int id; private String name; private String pwd; }
编写接口
1 2 3 4 5 6 7 8 9 10 11 12 13 14 15 16 17 18 19 package mapper;import java.util.List;import org.mybatis.spring.SqlSessionTemplate;import pojo.User;public class UserMapperImpl implements UserMapper { private SqlSessionTemplate sqlSessionTemplate; public void setSqlSessionTemplate (SqlSessionTemplate sqlSessionTemplate) { this .sqlSessionTemplate = sqlSessionTemplate; } public List<User> getUser () { UserMapper mapper = sqlSessionTemplate.getMapper(UserMapper.class); return mapper.getUser(); } }
编写接口的实现类
1 2 3 4 5 6 7 8 9 10 11 12 13 14 15 16 17 18 19 package mapper;import java.util.List;import org.mybatis.spring.SqlSessionTemplate;import pojo.User;public class UserMapperImpl implements UserMapper { private SqlSessionTemplate sqlSessionTemplate; public void setSqlSessionTemplate (SqlSessionTemplate sqlSessionTemplate) { this .sqlSessionTemplate = sqlSessionTemplate; } public List<User> getUser () { UserMapper mapper = sqlSessionTemplate.getMapper(UserMapper.class); return mapper.getUser(); } }
编写接口相映的mapper
1 2 3 4 5 6 7 8 9 10 11 <?xml version="1.0" encoding="UTF-8" ?> <!DOCTYPE mapper PUBLIC "-//mybatis.org//DTD Config 3.0//EN" "http://mybatis.org/dtd/mybatis-3-mapper.dtd" > <mapper namespace ="mapper.UserMapper" > <select id ="getUser" resultType ="pojo.User" > select * from mybatis.mybatis </select > </mapper >
mybatis-config.xml(可以省略不写,如果需要额外的配置,将mybatis的配置写在里面)
1 2 3 4 5 6 7 8 9 10 11 12 13 14 15 16 <?xml version="1.0" encoding="UTF-8" ?> <!DOCTYPE configuration PUBLIC "-//mybatis.org//DTD Config 3.0//EN" "http://mybatis.org/dtd/mybatis-3-config.dtd" > <configuration > <settings > <setting name ="logImpl" value ="STDOUT_LOGGING" /> </settings > <typeAliases > <package name ="pojo" /> </typeAliases > </configuration >
spring-dao.xml(mybatis的主要配置)
1 2 3 4 5 6 7 8 9 10 11 12 13 14 15 16 17 18 19 20 21 22 23 24 25 26 27 28 29 30 31 32 33 34 35 <?xml version="1.0" encoding="UTF-8" ?> <beans xmlns ="http://www.springframework.org/schema/beans" xmlns:xsi ="http://www.w3.org/2001/XMLSchema-instance" xmlns:aop ="http://www.springframework.org/schema/aop" xsi:schemaLocation ="http://www.springframework.org/schema/beans https://www.springframework.org/schema/beans/spring-beans.xsd http://www.springframework.org/schema/aop https://www.springframework.org/schema/aop/spring-aop.xsd" > <bean id ="datasource" class ="org.springframework.jdbc.datasource.DriverManagerDataSource" > <property name ="driverClassName" value ="com.mysql.cj.jdbc.Driver" /> <property name ="url" value ="jdbc:mysql://127.0.0.1:3306/mybatis?useSSL=false& useUnicode=true& characterEncoding=utf-8& serverTimezone=Asia/Shanghai" /> <property name ="username" value ="root" /> <property name ="password" value ="root" /> </bean > <bean id ="sqlSessionFactory" class ="org.mybatis.spring.SqlSessionFactoryBean" > <property name ="dataSource" ref ="datasource" /> <property name ="configLocation" value ="classpath:mybatis-config.xml" /> <property name ="mapperLocations" value ="classpath:mapper/*.xml" /> </bean > <bean id ="sqlSession" class ="org.mybatis.spring.SqlSessionTemplate" > <constructor-arg index ="0" ref ="sqlSessionFactory" /> </bean > </beans >
applicationContext.xml (总配置类)
1 2 3 4 5 6 7 8 9 10 11 12 13 14 15 16 17 <?xml version="1.0" encoding="UTF-8" ?> <beans xmlns ="http://www.springframework.org/schema/beans" xmlns:xsi ="http://www.w3.org/2001/XMLSchema-instance" xmlns:aop ="http://www.springframework.org/schema/aop" xsi:schemaLocation ="http://www.springframework.org/schema/beans https://www.springframework.org/schema/beans/spring-beans.xsd http://www.springframework.org/schema/aop https://www.springframework.org/schema/aop/spring-aop.xsd" > <import resource ="spring-dao.xml" /> <bean id ="userMapper" class ="mapper.UserMapperImpl" > <property name ="sqlSessionTemplate" ref ="sqlSession" > </property > </bean > </beans >
10.2、mybatis-spring方式二 显现类继承SqlSessionDaoSupport
1 2 3 4 5 6 7 8 9 10 11 12 13 14 package mapper;import pojo.User;import org.apache.ibatis.session.SqlSession;import org.mybatis.spring.support.SqlSessionDaoSupport;import java.util.List;public class UserMapperImpl2 extends SqlSessionDaoSupport implements UserMapper { public List<User> getUser () { SqlSession sqlSession = getSqlSession(); UserMapper mapper = sqlSession.getMapper(UserMapper.class); return mapper.getUser(); } }
spring-dao.xml 相应修改
1 2 3 4 5 6 7 8 9 10 11 12 13 14 15 16 17 18 19 20 21 22 23 24 25 26 27 28 29 30 31 <?xml version="1.0" encoding="UTF-8" ?> <beans xmlns ="http://www.springframework.org/schema/beans" xmlns:xsi ="http://www.w3.org/2001/XMLSchema-instance" xmlns:aop ="http://www.springframework.org/schema/aop" xsi:schemaLocation ="http://www.springframework.org/schema/beans https://www.springframework.org/schema/beans/spring-beans.xsd http://www.springframework.org/schema/aop https://www.springframework.org/schema/aop/spring-aop.xsd" > <bean id ="datasource" class ="org.springframework.jdbc.datasource.DriverManagerDataSource" > <property name ="driverClassName" value ="com.mysql.cj.jdbc.Driver" /> <property name ="url" value ="jdbc:mysql://127.0.0.1:3306/mybatis?useSSL=false& useUnicode=true& characterEncoding=utf-8& serverTimezone=Asia/Shanghai" /> <property name ="username" value ="root" /> <property name ="password" value ="root" /> </bean > <bean id ="sqlSessionFactory" class ="org.mybatis.spring.SqlSessionFactoryBean" > <property name ="dataSource" ref ="datasource" /> <property name ="configLocation" value ="classpath:mybatis-config.xml" /> <property name ="mapperLocations" value ="classpath:mapper/*.xml" /> </bean > </beans >
applicationContext.xml(相应的bean 参数修改)
1 2 3 4 5 6 7 8 9 10 11 12 13 14 15 16 <?xml version="1.0" encoding="UTF-8" ?> <beans xmlns ="http://www.springframework.org/schema/beans" xmlns:xsi ="http://www.w3.org/2001/XMLSchema-instance" xmlns:aop ="http://www.springframework.org/schema/aop" xsi:schemaLocation ="http://www.springframework.org/schema/beans https://www.springframework.org/schema/beans/spring-beans.xsd http://www.springframework.org/schema/aop https://www.springframework.org/schema/aop/spring-aop.xsd" > <import resource ="spring-dao.xml" /> <bean id ="userMapper2" class ="mapper.UserMapperImpl2" > <property name ="sqlSessionFactory" ref ="sqlSessionFactory" > </property > </bean > </beans >
11、声明式事务
把一组业务当成一个业务来做;要么都成功,要么都失败!
事务在项目开发中,十分的重要,涉及到数据的一致性问题
确保完整性和一致性
事务的ACID原则:
Spring中的事务管理
声明式事务:AOP
编程式事务:需要再代码中,进行事务管理
声明式事务:
首先导入依赖
1 2 3 4 5 6 7 8 9 10 11 12 13 14 15 16 17 18 19 20 21 22 23 24 25 26 27 28 29 30 31 32 33 34 35 36 37 38 39 40 41 42 43 44 45 46 47 48 49 50 51 52 53 54 55 56 57 58 59 60 61 62 63 64 65 66 67 68 69 <dependencies > <dependency > <groupId > org.springframework</groupId > <artifactId > spring-webmvc</artifactId > <version > 5.2.7.RELEASE</version > </dependency > <dependency > <groupId > org.aspectj</groupId > <artifactId > aspectjweaver</artifactId > <version > 1.9.4</version > </dependency > <dependency > <groupId > org.springframework</groupId > <artifactId > spring-jdbc</artifactId > <version > 5.2.7.RELEASE</version > </dependency > <dependency > <groupId > org.mybatis</groupId > <artifactId > mybatis</artifactId > <version > 3.5.2</version > </dependency > <dependency > <groupId > org.mybatis</groupId > <artifactId > mybatis-spring</artifactId > <version > 2.0.4</version > </dependency > <dependency > <groupId > mysql</groupId > <artifactId > mysql-connector-java</artifactId > <version > 8.0.12</version > </dependency > <dependency > <groupId > org.projectlombok</groupId > <artifactId > lombok</artifactId > <version > 1.18.12</version > </dependency > </dependencies > <build > <resources > <resource > <directory > src/main/java</directory > <includes > <include > **/*.properties</include > <include > **/*.xml</include > </includes > <filtering > false</filtering > </resource > <resource > <directory > src/main/resources</directory > <includes > <include > **/*.properties</include > <include > **/*.xml</include > </includes > <filtering > false</filtering > </resource > </resources > </build >
实体类
1 2 3 4 5 6 7 8 9 10 11 12 13 package pojo;import lombok.AllArgsConstructor;import lombok.Data;import lombok.NoArgsConstructor;@Data @AllArgsConstructor @NoArgsConstructor public class User { private int id; private String name; private String pwd; }
编写mapper接口
1 2 3 4 5 6 7 8 9 10 11 12 package mapper;import java.util.List;import org.apache.ibatis.annotations.Param;import pojo.User;public interface UserMapper { public List<User> getUser () ; public int insertUser (User user) ; public int delUser (@Param("id") int id) ; }
编写mapper实现类
1 2 3 4 5 6 7 8 9 10 11 12 13 14 15 16 17 18 19 20 21 22 23 24 25 26 package mapper;import pojo.User;import org.apache.ibatis.session.SqlSession;import org.mybatis.spring.support.SqlSessionDaoSupport;import java.util.List;public class UserMapperImpl extends SqlSessionDaoSupport implements UserMapper { public List<User> getUser () { User user = new User (5 ,"你好" ,"ok" ); insertUser(user); delUser(5 ); SqlSession sqlSession = getSqlSession(); UserMapper mapper = sqlSession.getMapper(UserMapper.class); return mapper.getUser(); } public int insertUser (User user) { return getSqlSession().getMapper(UserMapper.class).insertUser(user); } public int delUser (int id) { return getSqlSession().getMapper(UserMapper.class).delUser(id); } }
mapper的xml文件
1 2 3 4 5 6 7 8 9 10 11 12 13 14 15 16 17 18 19 20 21 <?xml version="1.0" encoding="UTF-8" ?> <!DOCTYPE mapper PUBLIC "-//mybatis.org//DTD Config 3.0//EN" "http://mybatis.org/dtd/mybatis-3-mapper.dtd" > <mapper namespace ="mapper.UserMapper" > <select id ="getUser" resultType ="pojo.User" > select * from mybatis.mybatis </select > <insert id ="insertUser" parameterType ="pojo.User" > insert into mybatis.mybatis (id,name,pwd) values (#{id},#{name},#{pwd}) </insert > <delete id ="delUser" parameterType ="_int" > deleteAAAAA from mybatis.mybatis where id = #{id} </delete > </mapper >
mybatis-config.xml
1 2 3 4 5 6 7 8 9 10 11 12 13 14 15 16 17 18 <?xml version="1.0" encoding="UTF-8" ?> <!DOCTYPE configuration PUBLIC "-//mybatis.org//DTD Config 3.0//EN" "http://mybatis.org/dtd/mybatis-3-config.dtd" > <configuration > <settings > <setting name ="logImpl" value ="STDOUT_LOGGING" /> </settings > <typeAliases > <package name ="pojo" /> </typeAliases > </configuration >
spring-dao.xml(已导入约束)
1 2 3 4 5 6 7 8 9 10 11 12 13 14 15 16 17 18 19 20 21 22 23 24 25 26 27 28 29 30 31 32 33 34 35 36 37 38 39 40 41 42 43 44 45 46 47 48 49 50 51 52 53 54 55 56 <?xml version="1.0" encoding="UTF-8" ?> <beans xmlns ="http://www.springframework.org/schema/beans" xmlns:xsi ="http://www.w3.org/2001/XMLSchema-instance" xmlns:aop ="http://www.springframework.org/schema/aop" xmlns:tx ="http://www.springframework.org/schema/tx" xsi:schemaLocation ="http://www.springframework.org/schema/beans https://www.springframework.org/schema/beans/spring-beans.xsd http://www.springframework.org/schema/tx https://www.springframework.org/schema/tx/spring-tx.xsd http://www.springframework.org/schema/aop https://www.springframework.org/schema/aop/spring-aop.xsd" > <bean id ="datasource" class ="org.springframework.jdbc.datasource.DriverManagerDataSource" > <property name ="driverClassName" value ="com.mysql.cj.jdbc.Driver" /> <property name ="url" value ="jdbc:mysql://127.0.0.1:3306/mybatis?useSSL=false& useUnicode=true& characterEncoding=utf-8& serverTimezone=Asia/Shanghai" /> <property name ="username" value ="root" /> <property name ="password" value ="root" /> </bean > <bean id ="sqlSessionFactory" class ="org.mybatis.spring.SqlSessionFactoryBean" > <property name ="dataSource" ref ="datasource" /> <property name ="configLocation" value ="classpath:mybatis-config.xml" /> <property name ="mapperLocations" value ="classpath:mapper/*.xml" /> </bean > <bean id ="transactionManager" class ="org.springframework.jdbc.datasource.DataSourceTransactionManager" > <constructor-arg ref ="datasource" /> </bean > <tx:advice id ="txAdvice" transaction-manager ="transactionManager" > <tx:attributes > <tx:method name ="add" propagation ="REQUIRED" /> <tx:method name ="delete" propagation ="REQUIRED" /> <tx:method name ="update" propagation ="REQUIRED" /> <tx:method name ="query" read-only ="true" /> </tx:attributes > </tx:advice > <aop:config > <aop:pointcut id ="txpointcut" expression ="execution(* mapper.*.*(..))" /> <aop:advisor advice-ref ="txAdvice" pointcut-ref ="txpointcut" /> </aop:config > </beans >
applicationContext.xml
1 2 3 4 5 6 7 8 9 10 11 12 13 14 15 <?xml version="1.0" encoding="UTF-8" ?> <beans xmlns ="http://www.springframework.org/schema/beans" xmlns:xsi ="http://www.w3.org/2001/XMLSchema-instance" xmlns:aop ="http://www.springframework.org/schema/aop" xsi:schemaLocation ="http://www.springframework.org/schema/beans https://www.springframework.org/schema/beans/spring-beans.xsd http://www.springframework.org/schema/aop https://www.springframework.org/schema/aop/spring-aop.xsd" > <import resource ="spring-dao.xml" /> <bean id ="userMapper" class ="mapper.UserMapperImpl" > <property name ="sqlSessionFactory" ref ="sqlSessionFactory" > </property > </bean > </beans >